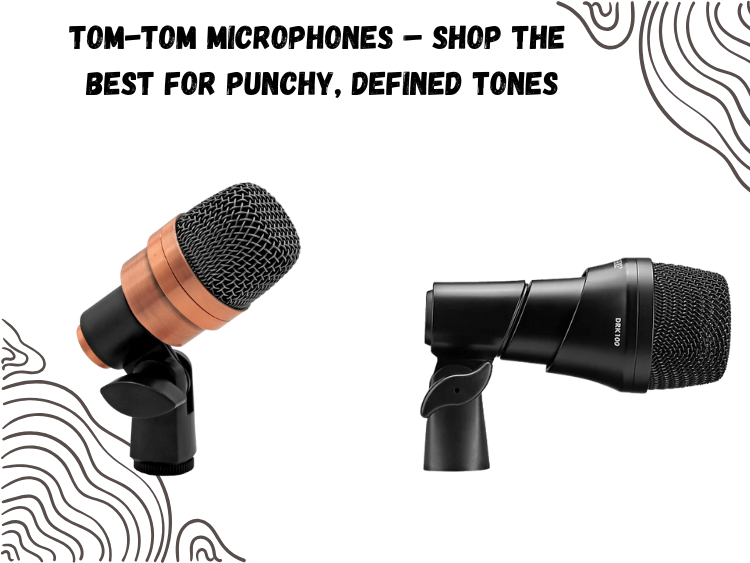
Getting Toms to sound tight, punchy, and full in a mix is no accident. You can tune them right, strike them well, and still end up with a flat or muddy result if your microphone isn’t built for the job. Tom mics are designed to capture the attack, resonance, and body of the drum without bleeding into everything else on the kit.
But let’s be honest: most generic mics marketed as “drum-ready” barely cut it. Either they choke the sustain or they’re too slow to catch the attack. That’s why if you care about tone—real tone—you need a mic that’s actually built for toms.
What Makes a Great Tom Mic?
Toms are dynamic, both literally and musically. A mic used here needs to keep up with quick stick hits, sustain the low-mid warmth, and avoid crumbling under high SPLs.
Here’s what to prioritize:
- Directional pickup (usually cardioid or hypercardioid): This minimizes bleed from nearby cymbals and snare.
- Tailored frequency response: Good tom mics accentuate the 80Hz–5kHz range, where the punch and body live.
- Compact or clip-on design: Especially for live gigs, space is tight. You want mics that fit easily without sacrificing placement.
These aren’t wishlist items—they’re baseline requirements. If your current setup isn’t hitting these marks, it’s time for a change.
5 Core’s Tom Microphone – Affordable, Durable, Built to Work
If you’re shopping with precision and budget in mind, the 5 Core Snare & Tom Mic is one of the smartest buys available.
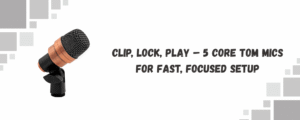
It’s built with a cardioid pickup pattern, which means your toms come through clearly, while cymbal bleed stays in the background. The frequency curve is sculpted for mid-punch and low-end warmth—perfect for rack and floor toms alike.
But what makes it stand out is the design. This is a clip-on mic made for easy mounting on hoops. No bulky stands, no awkward angles. The mic locks in close and tight to the shell, so your tone is focused and your setup stays clean.
It also handles SPL like a champ. You can lay into your toms during a live set, and it won’t crackle or distort. That makes it ideal for heavy hitters and rock drummers who don’t want their tone compressed into oblivion.
A Full Kit Alternative: Digital Reference DRDK7
If you’re looking for something more all-in-one—say, a full upgrade to your drum mic arsenal—the Digital Reference DRDK7 is worth a hard look.
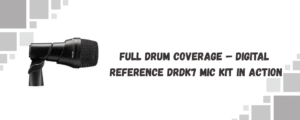
It comes with three dedicated tom mics, along with snare, kick, and two overhead condensers. And these aren’t generic capsules in plastic shells. The tom mics are tight, with a natural low-mid bump that gives rack and floor toms extra authority without sounding boomy.
They also come with rim mounts, which means you can place them exactly where you need them without bringing an extra fleet of mic stands. The result? Better isolation, faster setup, and a cleaner stage layout.
For live drummers constantly packing and unpacking, that’s a practical edge you’ll feel night after night.
Clip-On vs. Traditional Mounting – What’s Best for Toms?
This isn’t just about aesthetics—it’s about mic placement. Clip-on mics like the 5 Core are great for locking into position fast and staying out of the way. You don’t need stands, and you won’t trip over cables mid-show.

They’re also ideal for tighter venues where space is limited. But keep in mind: placement flexibility can be slightly reduced depending on your drum’s hardware.
Traditional stand-mounted mics offer more placement precision, especially in the studio. If you’re chasing that perfect 1-inch sweet spot between attack and resonance, stands give you the freedom to experiment.
In short:
- Live? Clip-ons win.
- Studio? Traditional mounts still hold the edge for surgical placement.
How to Mic Toms for Maximum Impact
Even the best mic won’t fix bad placement. If you want toms to sound tight and defined, follow a few simple rules:
- Aim for the center of the head, slightly off-axis. This captures the punch without excessive attack harshness.
- Stay 1–2 inches above the rim. Too close, and the mic distorts. Too far, and you pick up bleed.
- Watch your angles. Point the mic downward, following the slope of the drum. This reduces cymbal spill.
If you’re using a floor tom mic, consider EQing out some boxiness around 400Hz and boosting a bit near 80–100Hz to emphasize the rumble.
Final Word: You Can’t Fake Punch
A lot of drummers will sink money into a fancy snare mic or a subkick and then wonder why their toms disappear in the mix. Don’t be that guy.
Toms need definition. They need controlled low end and a fast transient response. Whether you go for the reliable 5 Core tom mic or invest in a full kit like the DRDK7, make sure your mics are actually tuned to the task.
You don’t need to blow your budget. You just need gear that’s built for the punch, warmth, and character that makes toms stand out.
And once you dial that in, your whole kit feels tighter. Your mixes get cleaner. And your live sound finally hits the way it’s supposed to.