You don’t get the Travis Barker sound by accident. It’s not just hard hitting—it’s clean, cutting, and somehow still full. Whether he’s hammering through a 200 BPM punk chorus or laying back in a hip-hop collab, his kit cuts through the mix like a blade. The secret? Mic placement. Mic choice. A bit of punk philosophy. And a lot of sweat.
Let’s break it down.
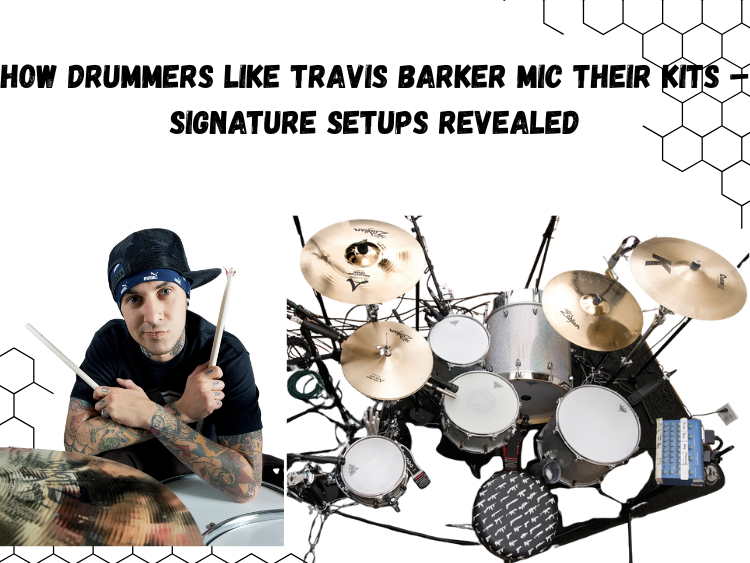
Snare First. Always.
Travis doesn’t baby the snare. He goes after it like it owes him money. That means one thing—your mic has to take a hit. Literally. Live engineers tend to go for a rugged dynamic mic, placed just off-center on the top head, angled in slightly to pick up that signature crack without overloading on bleed.
The bottom snare mic? It’s optional in punk. But when used, it’s pulled back slightly to avoid a brittle sound. And phase-checking is non-negotiable. Barker’s snare is bright, but never tinny.
Kick It Like You Mean It

His kick is punchy, fast, and upfront. No muddy boom here. The inside mic placement is key—jammed deep into the port hole, pointing right at the beater for max attack. Sometimes you’ll catch a second mic just outside the shell for low-end beef, especially in studio setups. But live? He keeps it lean and mean. Less gear. Less guesswork.
Toms That Don’t Back Down
Rack and floor toms are tuned tight and hit hard. Close-miking is standard—dynamic mics clipped directly onto the rims, inches from the head. There’s bleed, sure. But in Travis’s world, that’s part of the charm. Engineers ride the faders, not the gates. You want presence? Mic it close and let it bark.
Overheads That Actually Work
This isn’t jazz. Barker’s overheads aren’t there for nuance—they’re there to catch cymbals that are being ripped. A spaced pair, high and wide, angled down at the cymbals, gets the job done. You don’t need them low; you need them clean. Too low and they’ll catch too much snare and tom spill. Too high and you’ll miss the crash decay. It’s a balancing act—literally.
Hi-Hats: Take It or Leave It
Some setups skip the hi-hat mic altogether. And honestly, it makes sense. When you’re bashing hats wide open, most overheads already grab enough of the metal. But if precision’s the goal, a small diaphragm condenser off-axis, a few inches above the edge, does the trick. Just be ready to duck it in the mix—it’s easy to overdo.
The Barker Signature Setup in Practice
There’s no magic mic model. It’s about how it’s used. Travis isn’t stacking boutique gear—he’s relying on placement, levels, and consistency. Most of his touring rigs stick with battle-tested dynamics. Sturdy mounts. Smart cable routing. Quick access for fast changeovers. That’s it.
His team doesn’t chase tone with plugins. They get it at the source—raw, real, and surgically placed mics that can take a beating. This isn’t pristine studio jazz. It’s punk with precision. That’s the difference.
Final Thoughts
If you’re chasing Travis Barker’s sound, don’t just look at the mics—look at the intent. Everything’s designed to support clarity under chaos. His mic setup doesn’t overcomplicate things—it’s lean, efficient, and brutally effective. You don’t need ten thousand dollars in gear. You need to know where to point it—and why.
Mic like that. Play like hell. The rest will follow.