At times like these, the kick drum is one of the most important parts of a drum kit. With that deep, punchy sound, it gives the song strength and drive. You can get the right kick drum tone in a studio or when you play live, but it can be hard. The place where you put your mic is very important. This article will talk about easy ways to set up your mics around the kick drum. It’s important to get those deep, strong, low-end sounds while keeping the punch and clarity you need for a great mix.
How the Kick Drum Sound Works
It’s important to know what you want to record from the kick drum before you start placing the mics. There are several parts that make up the sound of a kick drum:
- Attack: The first hit on the drumhead by the beater, which gives the sound punch and clarity.
- Body: The tone that comes from inside the drum shell and gives it fullness and low-end volume.
- Sustain: The drum’s ringing or decaying sound after the first hit.
- Beater sound: The click or slap that happens when the beater hits the drumhead.
Although each part of a kick drum makes the sound whole, producers and engineers often want to focus on the low-end “thump” while keeping just the right amount of attack to keep the kick sounding punchy and clear in the mix.

What Kind of Mic Works Best for Kick Drums?
It can really help to pick the right microphone. Most of the time, engineers:
- Dynamic Microphones: If you want to record the loud hit of a kick drum, you should use a dynamic microphone. These can handle high sound pressure levels (SPL). When it comes to kick drums, 5core drum mic kit, the Shure Beta 52A, the AKG D112, and the Electro-Voice RE20 are all classics.
- Condenser Microphones: These are often used as an extra mic inside the drum to record more pressure and detail.
- Boundary or PZM Mics: Sometimes put inside the drum to pick up a certain sound.
But where you put the mic is just as important as what mic you choose.
Simple Ways to Place a Kick Drum Mic
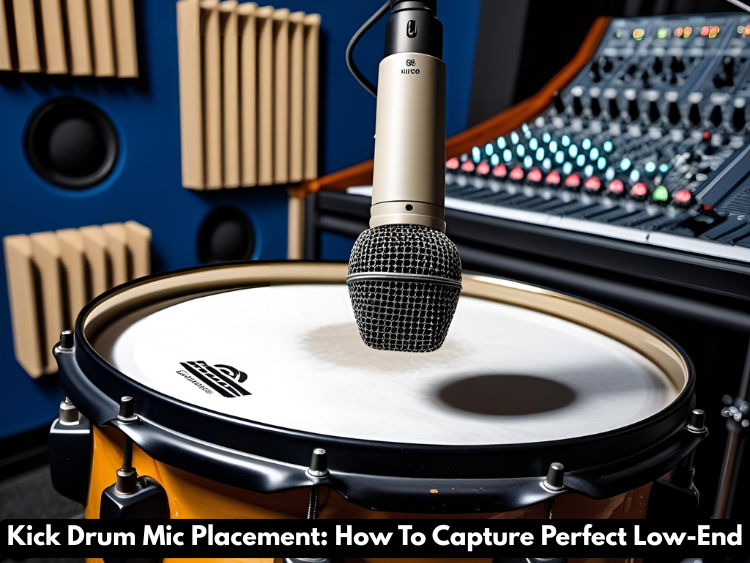
1. Outside the Kick Drum (Front Mic)
This is the most usual way to do it. Put a dynamic microphone about 2 to 6 inches away from the front hole (the resonating head) of the kick drum. Aim the mic at the beater with its face facing the hole.
- When you put it closer (2 to 3 inches), the sound has more bite and beating, but less reverberation.
- When placed farther away (4–6 inches), the low end resonates more and the beater clicks less.
This way gets the full, round low end while keeping the clarity if the drum has a ported front head. Changing the mic’s angle—slightly off-center or straight on the hole—will also change the mix of the sounds.
2. Inside the Kick Drum (Mic Inside)
A mic is put inside the kick drum and usually hangs from a small stand or clip inside the shell near the beater head. This records the attack and snap of the beater hitting the drumhead. Small diaphragm dynamic mics or condenser mics are often used for this.
- Put the mic inside the drum about 3 to 6 inches and face the beater.
- If you get too close, the sound might get too loud or muffled.
This mic is often mixed with the outside mic to make it clearer and stronger.
3. Placement on the Beater Side
A small microphone directed directly at the batter side of the drumhead inside the shell is used by some engineers to add more bite and presence. This captures the crispness of the first hit.
4. Mic Placement in the Back
A mic can be put inside the drum behind the porthole on the front head to pick up the low-end body. This happens more often in jazz or softer music forms that like a natural sound.
5. Mic in the Room
A room mic put a few feet away from the kick drum can pick up the natural ambiance of the drum and give the sound more depth.

How to Get the Perfect Kick: Putting the Drum Mic
- Try different angles and distances: Tone can change a lot with small changes. Closer is better for attack, and farther is better for boom.
- Use more than one mic: You can blend attack and body by putting together an inside mic and an outside mic.
- Check the phase alignment: If you’re using more than one mic, listen for phase problems that can make sounds sound thin or hollow. If you need to, switch the direction on one mic.
- Separate the kick: If other drum sounds get into the kick mic too much, use a drum shield or gobos.
- Tune your drum: When you place the mic, how well it works depends on how the drum is tuned and which head you choose. Of course, a drum that is tuned well sounds better.
- Use EQ and compression: Even if you place the mics perfectly, a little EQ to boost the low sounds and compression to manage the dynamics will help you shape the kick sound.
Conclusion
It’s both a science and an art to get the right kick drum sound. You can get closer to that deep, strong low end that every mix needs by learning how the drum makes sound and how the placement of the mic affects what is picked up. Start by putting the mics outside and inside as you normally would. Then try different angles and distances, and don’t forget how important it is to phase check and mix different sources. You’ll get that kick drum tone that makes your tracks groove if you play and wait.