
A great gear alone is not enough to give you a great drum sound. You must also know how to use it. Using multiple mic and layering them, as well as having a solid sound mix, is de facto an advantage when recording in the studio or performing on the stage. To produce a thick, full drum sound that is apparent yet still warm and rich, it is important to be careful of the mic placements and how you blend them. By placing these drum mics on top of each othe,r you should have that bigger, punchier sound that you desire.

1. Build a Strong Base with Kick and Snare
The sound of your drums is built around your kick and snare. If you layer these right, you can add power and personality without making things too muddy.
Adding a Kick Drum Mic Inside: Place a dynamic mic like the Shure Beta 91A or AKG D112 inside the drum, close to the beater. This is called the kick mic. That’s the strike and punch captured.
Outside Kick Mic: Put a large-diaphragm condenser right outside the hole or shell to record the low-end boom and body.
Subkick: To get extra weight, you could use a Yamaha Subkick or a speaker mic that you make yourself.
Mix these sounds however you like. The inside mic usually adds punch and clarity, the outside mic adds depth, and the subkick mic brings the bass down to your chest.
Layering Snare Drum Mics
Top Snare Mic: A cardioid dynamic mic (like the SM57) placed a few inches above the snare picks up snap and movement.
Bottom Snare Mic: The sound of the wires is picked up by a condenser or another dynamic mic placed under the snare. That way, phase termination won’t happen.
Optional: Place a condenser mic off to the side and about three feet away. This will pick up the “crack” and body of the snare in the room.
When you mix, keep phase problems in mind. For example, phase meters or polarity switches can help you make sure that the snare sounds focused and not hollow.
2. Toms: Scale and Depth
Each tom should have a dynamic mic of its own, and this should be placed roughly an inch above the head and angling out so that the cymbal noise does not creep into the sound.
The straight strike and tone get picked up with the top mic.
Does more vibration with optional bottom mic. This is a point where direction must be changed.
In case of inadequate sources, you might use the racks of toms with a stereo pair or rely more heavily on the overheads and room mics to pick up the tom noise.
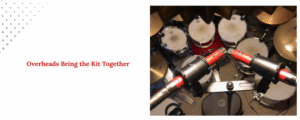
3. Overheads: The Glue
Overheads aren’t just cymbal mics; they create an audio picture and sense of space for your kit.
Spaced Pair: For a wide stereo field, put two condensers above the kit. Great for current, rough sounds.
If you want to make records that are more focused and phase-coherent, try XY or ORTF.
Height Is Important: The more “room” and atmosphere you capture, the higher your overheads should be. When you place the cymbals lower, you get more depth and sharpness in the short term.
When mixing, make sure the overheads are balanced so they work well with the close mics without being too loud. Roll off the low end with EQ to keep the kick and drum sounds from going out of phase.
4. Room Mics: How Big and Where Do They Go
It sounds fuller and more realistic when room mics are used.
Mono Room Mic: You can crush it with compression for powerful energy if you put it 6 to 10 feet away from the kit.
Audio Room Pair: Putting a spaced pair (or Blumlein) from the kit in a balanced way adds depth and audio spread.
Far Mics: For a weird, low-fidelity sound, put a mic in a hallway, bathroom, or studio corner.
Putting room mics on top of close mics can change the sound of your drums. Adjust their volume, frequency, or appearance automatically based on the song’s part.

5. Trash Mics and Background Noise: Creative Layers
Want more grit or vibe?
Use a cheap mic (or a ribbon) over the kit and smash it with a compressor. This is called an overhead mono trash mic.
Floor Mic: Put a mic on the floor to record weird shadows and low-end fuzz.
Mic in a Can: For different sounds, put mics in boxes, jars, or behind furniture.
These mics aren’t “essential,” but adding them in layers can give your sound more character and glue it together.
6. It’s Important to Align the Phases
When you use more than one mic, phase matching can make or break your sound. Tones will be thin and weak if the mics are not in phase with each other. To line up transients (especially kick and snare hits) across mics, use time-aligning tools in your DAW or move waves around by hand.
To check the phase relationships between mic pairs, especially kick in/out, snare top/bottom, and tom mics vs. overheads, use a polarity flip switch.
7. Combining Mics with Layers
After recording, add layers with a purpose:
EQ: Cut out sounds that overlap so that each mic works well with the others.
Do not kill the dynamics when you use parallel compression on room or snare mics to add punch.
For pan, use audio overheads and toms to add width. Keep your kick, catch, and subkick in the middle.
Send close mics to the same echo bus as the room mics to make the place sound bigger.
Last Thoughts
Layering drum mics is not about creating more, but creative mish-mashing of sources to create a loud, broad, and full sound. By listening to where you place the mic, the match of the phases, and the mixing procedure, you are able to make a simple drum sound into a thundering rhythmic centre.
Drum mic mixing is one of the most effective methods that can enhance your sound. This is irrespective of whether you are recording in a recording studio or in your bedroom.