
There is a right way and a wrong way to use a microphone for drums. A well-miked drum kit is the difference between a thin, lifeless sound and a powerful, punchy mix. Unfortunately, a lot of drummers and sound engineers tend to make similar errors that ruin the entire sound. With that in mind, in this article, we take a look at the top five miking mistakes to avoid if you want your kit to sound as good as possible live and in the studio.

1. Poor Mic Placement
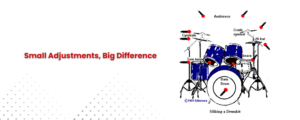
Bad mic placement has to be one of the most common mistakes made while miking drums. Moving the grill away from the microphone will help it sound less hollow.
Common Placement Errors:
- Too Close To The Drumhead: This causes an exaggerated boomy or muddy sound with more low-end frequencies.
- Far Away: This can pick up too much ambient room and not enough attack of the drums.
- Bad Angling: Holding the mic too far away from the voice could result in a weak or empty sound.
Best Practices:
- For snare drums — using a clip, put in two fingers above the rim at a 45 degrees aiming towards the center.
- Bass drums — a mic inside the drum just close to the beater for attack, or slightly outside for a fuller, rounder tone.
- For toms — place the mic 2-4 inches from the drumhead at an angle.
- For overheads — position those up high enough to pick up the whole kit while keeping the phase issues down.
2. Ignoring Phase Issues
The sound of the drum can sometimes cancel out at some frequencies due to phase problems, especially if the sounds produced are picked up by more than one microphone (which they often are). These things happen a lot with multi-mic setups, especially when you have overheads and room mics.
How to Detect Phase Issues:
- If your drums sound weak or hollow, even with accurate mic placement, phase cancellation may be the culprit.
- Listen in mono—if the audio quality gets worse, you almost definitely have phase problems.
How to Fix It:
- Make sure microphones are all at about the same distance wherever possible, especially for overheads.
- Mic the drums according to the 3:1 rule: If a mic is 1 foot away from a drum, any other mic needs to be at least 3 feet away from whatever the first mic is capturing.
- Use the phase invert button (Ø) on your mixer or DAW if necessary to see if alignment is improved.
3. Overuse of Room Mics
Room mics can be great for adding depth and ambience to your drum sound, but they can also muddy things up with excess sustain and “splash,” and downplay the clarity in your sound if you rely too heavily on them. In untreated rooms with bad acoustics in particular, excess reflections can create a washed-out, uncontrolled sound.
Mistakes to Avoid:
- Room mics are used in a small, untreated space with no acoustic treatment.
- Getting room mics too loud in the mix, losing all the punch and definition.
- They sit in the corner of your control room.
Best Practices:
- In a well-treated space, place room mics 6-10 feet away from the kit.
- Add them in a discreet mix with the close mics rather than as the sole source.
- Try stereo techniques such as X/Y or spaced pair configurations to achieve more width and clarity.
4. Choosing the Wrong Microphones
When it comes to drum recording, not every microphone is fit to do the job. Each decade has a mic that works best, and there are many types of mics to choose from, each with its own strengths and weaknesses, which can lead to a very poor representation of what your drum kit sounds like.
Common Mistakes:
- Using dynamic mics for everything: Dynamic microphones are excellent at close-miking snares and toms, but they don’t always get the detail in cymbals and overheads.
- Using vocal condensers instead of instrument condensers: Vocal condensers may not bear the high SPL (Sound Pressure Level) of drums, causing distortions.
- Disregarding the bass drum mic choice: Some mics do not have the low-end response to handle the power of a kick drum well.
Best Mic Choices for Drums:
- Kick Drum: Large-diaphragm dynamic mic (5Core Drum Mic, or Audix D6)
- Snare Drum: Shure SM57, Audix i5, or Beyerdynamic M201
- Toms: Sennheiser MD421, Shure Beta 56A, or AKG C414
- Overheads & Cymbals: Small-diaphragm condensing mics (Neumann KM184, AKG C451, or Rode NT5)
- Room Mics: For a room mic, aim for something like a large-diaphragm condenser, such as an AKG C414, or ribbon mics for a warmer sound.

5. Lack of Proper Mixing and Processing
However, without proper EQ, compression, and gating, your drum sound may still end up thin and lopsided despite excellent mic placement and choice. This is a trap most beginners fall into — they end up relying excessively on unprocessed audio.
Common Mixing Mistakes:
- Generally incorrect EQ: Some drum frequencies can be over-boosted or undercut, leading to unnatural drum sounds.
- Do-nothing compression: Results in a dull drum sound with little dynamics.
- Overdoing it: Excessive reverb or effects can render the drums sounding synthetic and buried in the mix.
Drum Mixing: Tips & Tricks
EQ Tips:
- Roll off unwanted frequencies: Rumble (sub 40Hz) has to be rolled off. No more rumble, and remove any boxiness (300-600Hz).
- Snare/tom attack: a +3-5kHz slight boost for an attack at 60-100Hz to add punch to a kick drum.
Compression Settings:
- Use light compression on the kick and snare to keep dynamics controlled.
- Preserve the natural transients and thickness with parallel compression.
Gating:
- Use gates sparingly to take out a bleed on toms and snare without making them sound unnatural.
Conclusion
By avoiding the top five traps — wrong mic placement, phase problems, overusing room mics, inappropriate mics, and not mixing properly — you will find your recordings or live drum tone greatly improved. It takes time to experiment with placement, phase alignment, microphone choice, and mixing techniques. With these best practices in mind, you’ll make sure your drums sound full, balanced, and impactful in any mix.